
The Fuel feature turns your fuel installation into a proper stock ledger. Every litre that goes into the tanks and every litre that comes out is recorded, so at any moment the system can tell you how much fuel it believes is in each tank, and dip readings are checked off against that figure.
At the same time it closes the gap that most schools lose money in: fuel dispensed into an aircraft is recorded against a customer account and invoiced automatically, using the price per litre, tax code and accounts code from a billing product you nominate. Fuel sold for cash is invoiced from the same page with one click.
Typical uses:
- Know what you are holding. The tank list shows calculated contents against capacity, so you can order fuel before you run dry, and you can prove your stock figure.
- Catch missing fuellings. Each entry records the pump meter reading. If the meter has moved further than the litres recorded, the entry is flagged in amber — usually someone fuelled and did not write it up.
- Reconcile with a dip. Record a dip reading and the system compares it with what the ledger expected. Green means the tank agrees with the paperwork; red means it does not.
- Bill it. No more month-end reconciliation against a paper fuel book. The Tanks page shows a red count of fuellings still waiting for an invoice, and it should read zero when you close the month.
- Keep the evidence. A photo of the pump screen, the delivery note or the calibration certificate can be attached to the record it belongs to.
Note: this is the pump and tank side of fuel. The fuel figures recorded per flight in the aircraft log are a separate thing and are not affected by anything on this page.
Turning it on
1. Check the feature is on your plan
Fuel is a chargeable option and is not part of the standard Bronze, Silver or Gold plans. If the Fuel entry does not appear on your Admin page, the feature is not on your subscription — contact Flight School Booking and we will add it.
Note that automatic invoicing of fuel also needs the Billing feature. Without billing you can still run the tanks, the meter checks and the dips; you just cannot raise invoices from the fuel log.
2. Switch the system on
Go to Admin > Fuel. The Preferences tab has a single setting:
- System availability — set to Enabled.
While it is set to Disabled, the Fuel tab and all fuel pages are hidden from everybody. The admin pages stay reachable, so you can set the tanks up before you switch it on.
3. Set up your tanks
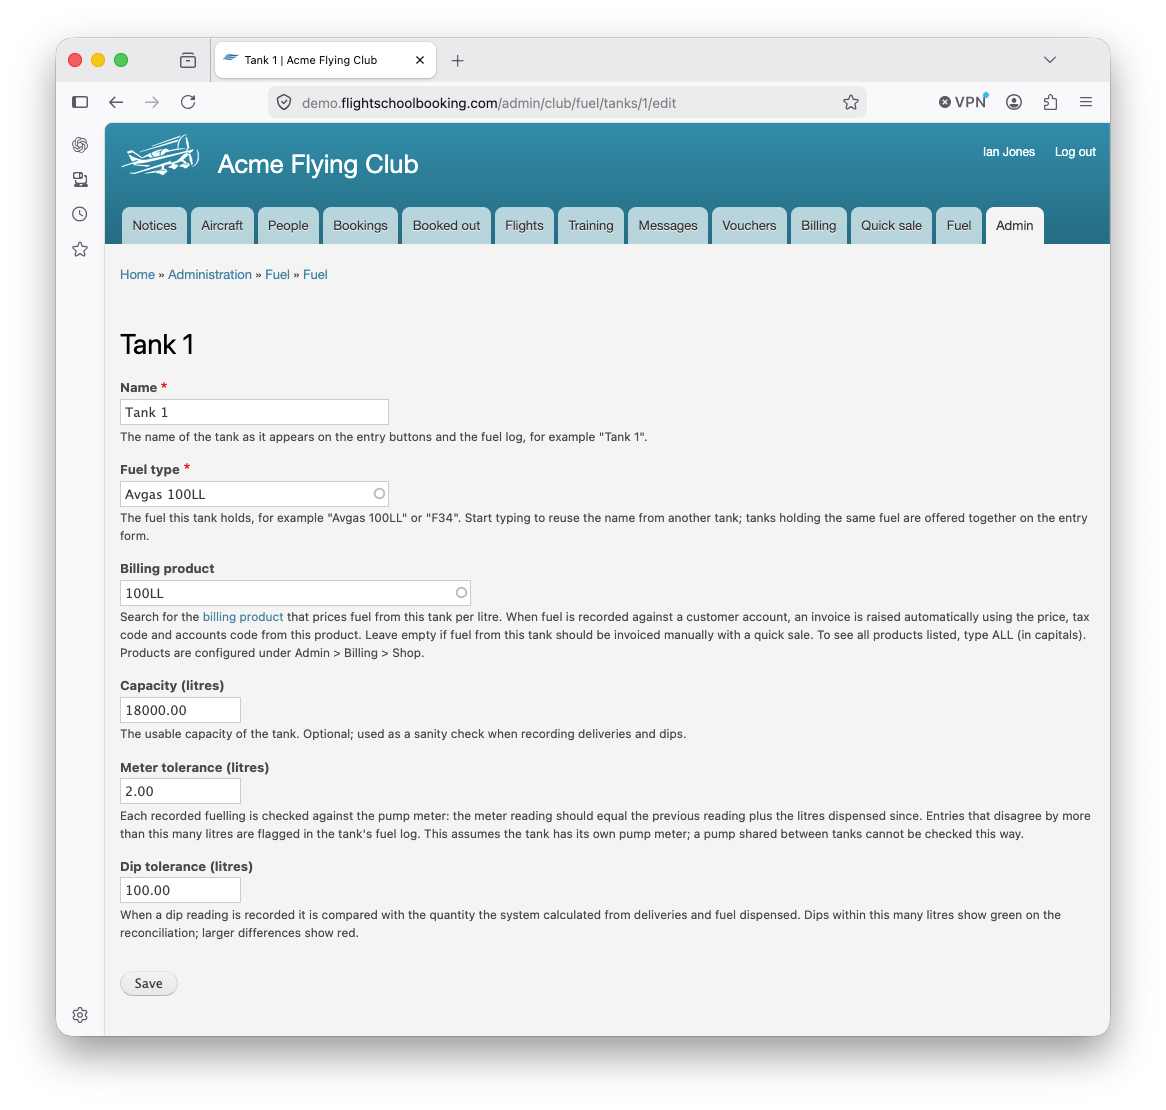
Go to Admin > Fuel > Tanks and click Add tank. Create one record for each physical tank on the airfield. The fields are:
| Field | What to put in it |
|---|---|
| Name | What your staff call it, e.g. Tank 1 or Bowser. This is what appears on the entry buttons and the fuel log. |
| Fuel type | The fuel this tank holds, e.g. Avgas 100LL, UL91 or Jet A-1. Start typing to reuse a name already used on another tank — tanks holding the same fuel are grouped together on the entry form. |
| Billing product | The billing product that prices this fuel per litre. Start typing to search, or type ALL in capitals to list everything. Leave it empty if fuel from this tank should only ever be invoiced by hand. |
| Capacity (litres) | The usable capacity. Optional; it is used as a sanity check and to show contents against capacity. |
| Meter tolerance (litres) | How far the pump meter may disagree with the litres recorded before an entry is flagged. |
| Dip tolerance (litres) | How far a dip reading may differ from the calculated contents and still count as agreeing. |
About the billing product. Fuel is priced from a normal billing product set up under Admin > Billing > Shop: price per litre including tax, the tax rate code and the accounts code all come from there. Create one product per fuel you sell (e.g. Avgas 100LL per litre) before you add the tanks. If two tanks hold the same fuel at the same price, point both at the same product.
About the tolerances. Start generous and tighten them once you see how your pump behaves. A meter tolerance of a couple of litres and a dip tolerance of around 1% of tank capacity are reasonable starting points. The meter check assumes the tank has its own meter; if one pump draws from two tanks, leave the meter reading blank when recording fuel and the check is simply not made.
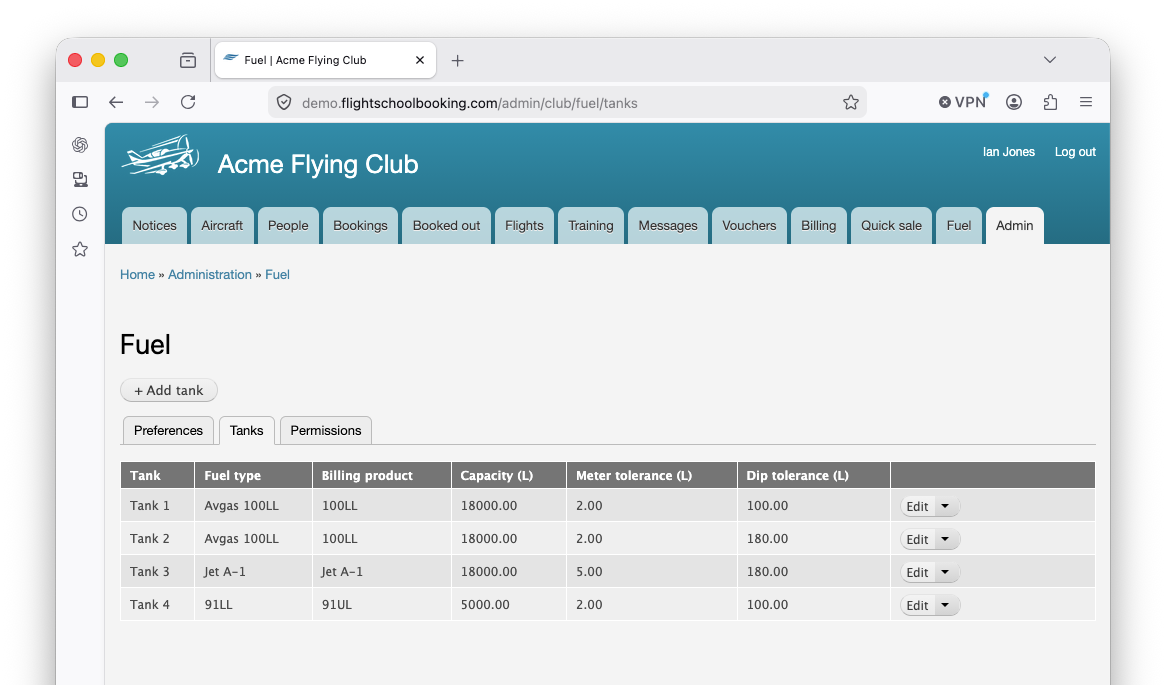
Once tanks exist, the Tanks page lists them with their fuel type, product, capacity and tolerances, and gives you Edit and Delete for each.
4. Decide who can do what
Go to Admin > Fuel > Permissions. There are four permissions:
| Permission | What it allows | Granted by default to |
|---|---|---|
| Access the Fuel tab | See the tank list and each tank's fuel log, and download the CSV. | Instructor, Office, Owner |
| Record fuel dispensed | Use the quick entry form to record fuel put into an aircraft. | Instructor, Office, Owner |
| Manage fuel records | Backdated entries, deliveries, dip readings, pump calibrations; edit and delete records; assign accounts and raise invoices. | Office, Owner |
| Administer fuel settings | Configure tanks, products and tolerances. | Office, Owner |
A good choice is to give instructors and staff Access the Fuel tab and Record fuel dispensed only. They can then fuel an aircraft and write it up, but the reconciling, the corrections and the invoicing stay with the office.
Raising an invoice from the fuel log also needs the billing permission Add invoices manually.
5. Set the starting contents
The ledger counts from the last dip reading. Until you record one it counts from an empty tank, and the tank page will say so. So the last step of setting up is to dip each tank and record the reading — see Recording a dip reading below.
Using it day to day
The Fuel tab
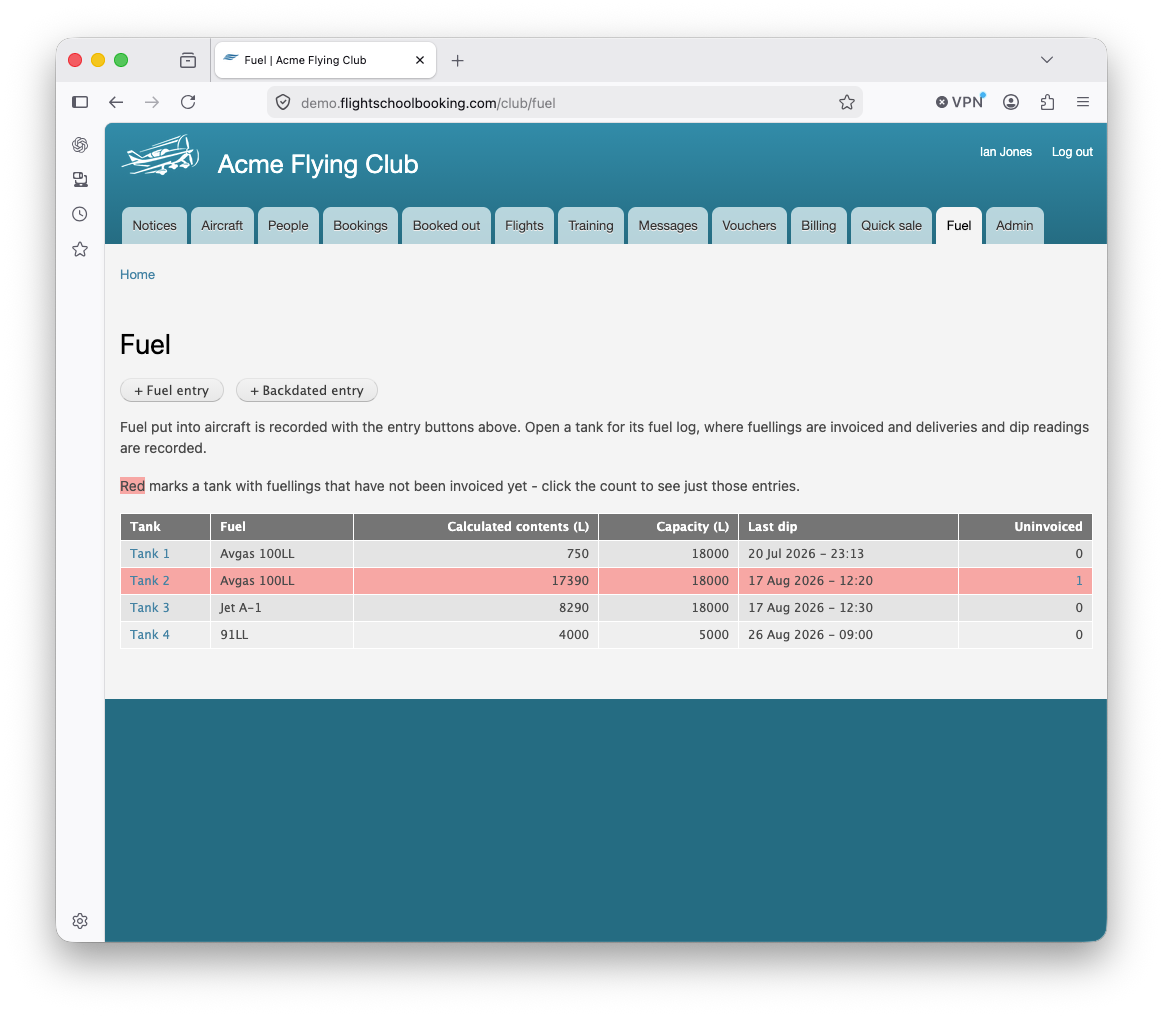
Fuel in the main tab bar is the tank list. One row per tank showing:
- Calculated contents — what the ledger believes is in the tank now.
- Capacity — if you entered one.
- Last dip — the date of the most recent dip reading, or Never.
- Uninvoiced — how many fuellings from that tank have not been invoiced. A tank with any uninvoiced fuel is shown in red; click the count to jump straight to those entries.
Click a tank name to open its fuel log. Decommissioned tanks are listed separately in a collapsed section at the bottom, so their history stays reachable.
Recording fuel into an aircraft
Click Fuel entry — the button is on the tank list and on every tank's fuel log. Opened from a tank page, that tank arrives already selected.
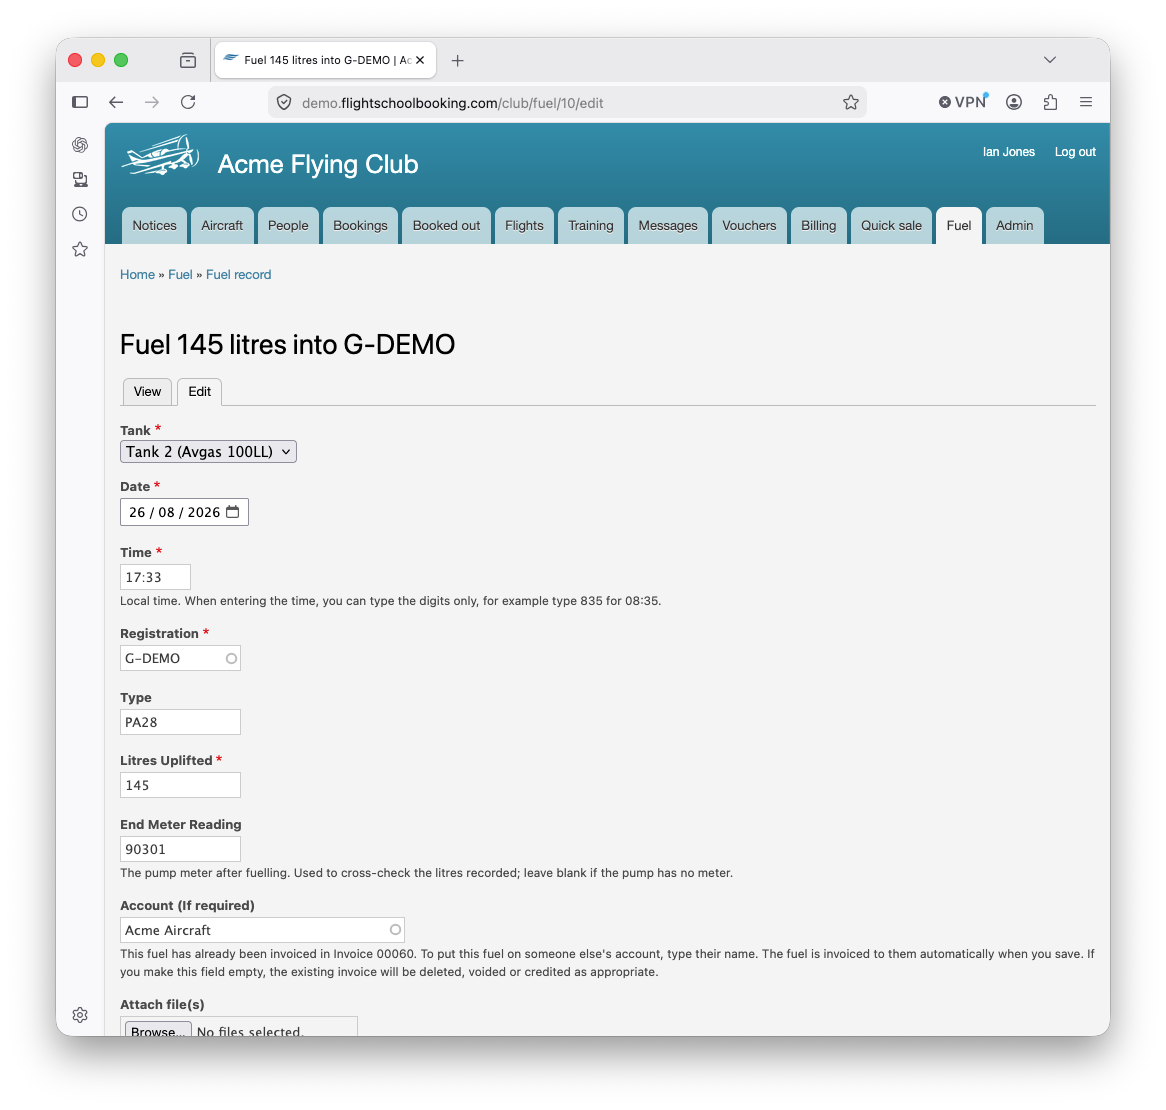
Fill in:
- Tank — which tank the fuel came from.
- Registration — start typing. The list offers your own aircraft first, then registrations that have been fuelled here before, so visiting aircraft are quick to find.
- Type — filled in automatically for your own aircraft; type it for a visitor (e.g. PA28).
- Litres Uplifted — what went in.
- End Meter Reading — the pump meter after fuelling. Leave blank if the pump has no meter, or if one pump serves several tanks.
- Account (If required) — type the customer's name to put the fuel on their account. Leave blank for a cash sale. If the aircraft has been fuelled here before, the account last invoiced for it is filled in for you.
- Attachment — optionally a photo of the pump screen as evidence.
Click Submit. The entry is recorded at the current time.
- With an account: the invoice is raised straight away and the confirmation message links to it. If the invoice cannot be raised — the tank has no billing product, or billing is not enabled for that customer — you get a warning and the entry sits on the fuel log waiting to be invoiced by hand.
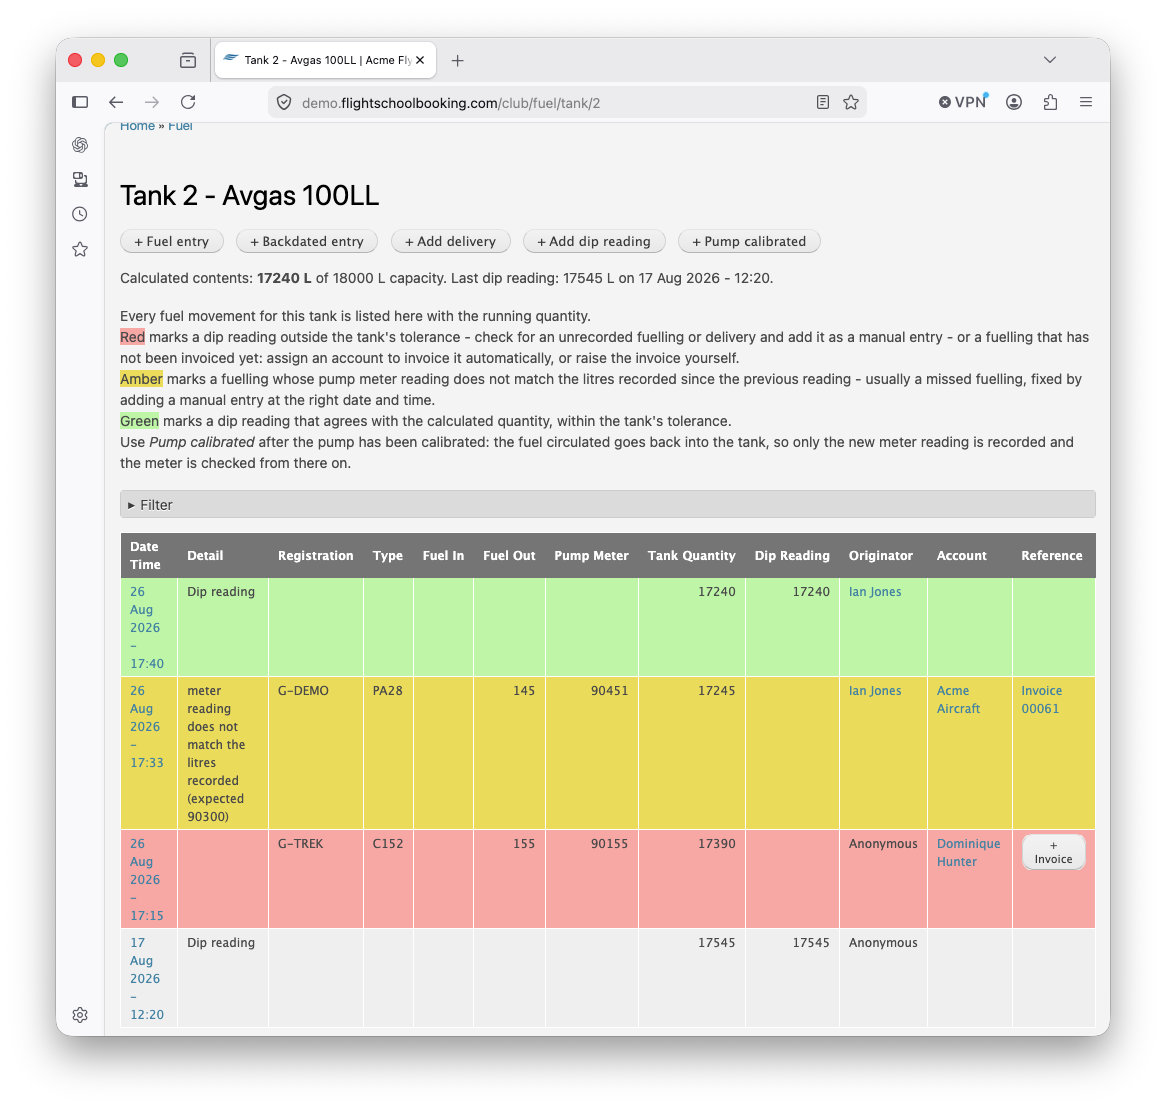
- Without an account: the entry shows on the fuel log in red with a + Invoice button.
Backdated entries
Backdated entry is the same form with a Date and Time added. Use it when a fuelling was missed and needs putting into the ledger at the right point — typically because a later entry has flagged a meter discrepancy. Inserting the missing entry at the correct date and time clears the flag on its own; nothing has to be recalculated by hand.
The time field accepts digits only, so 835 is understood as 08:35.
The fuel log
Clicking a tank opens its log: every fuel movement, newest first, with the running quantity after each one.
At the top is a summary — the calculated contents against capacity, and the date of the last dip. Below that is the colour key:
- Red — a dip reading outside tolerance, or a fuelling that has not been invoiced yet.
- Amber — a fuelling whose pump meter does not match the litres recorded since the previous reading. Nearly always a missed fuelling; fix it with a backdated entry.
- Green — a dip reading that agrees with the calculated quantity, within tolerance.
The Account and Reference columns show the invoicing state of each fuelling: either the customer and a link to their invoice, or the account waiting to be billed and a + Invoice button.
Use Filter to narrow the log by date range, to change how many rows show per page, or to tick Only show fuellings without an invoice. Export CSV downloads whatever the filter is currently showing, running quantities included.
Recording a delivery
Open the tank and click Add delivery:
- Date and Time of the delivery.
- Litres delivered.
- Reference — the delivery note or supplier invoice number, if you want it on record.
- Attachment — a photo or scan of the delivery note.
The litres are added to the running quantity from that moment on.
Recording a dip reading
Open the tank and click Add dip reading. The form tells you what the system calculates the tank is holding, so you can compare before you commit. Enter the date, time and the measured contents, and optionally attach a photo of the dip.
On saving you are told either that the dip is within tolerance, or by how much it differs from what was expected, with a prompt to look for an unrecorded fuelling or delivery.
The dip is the anchor. Whatever you enter becomes the new starting point for the running quantity — everything after it is counted forward from that figure. Dipping regularly (weekly is common, and at every delivery) keeps the calculated contents correct.
After the pump is calibrated
Calibrating a pump circulates fuel through it and back into the tank: the meter advances a long way while nothing actually leaves. Recording this as a fuelling would look like hundreds of missing litres.
Open the tank, click Pump calibrated, and enter the date, time and the meter reading after calibration (plus a note and the certificate if you have one). The tank contents are left untouched and no dip is needed. From that entry onwards the meter is checked against the new reading, so the calibration litres are never reported as missing fuel.
Correcting a record
Click the date and time of any row in the fuel log to open the record. It shows everything recorded, including any attachments, with Edit and Delete tabs for staff who have Manage fuel records.
- Editing an invoiced fuelling is allowed. On save, the invoice is worked out afresh and compared with the one linked to the record. If nothing that affects the invoice changed, the invoice stands. If it did, the old invoice is deleted, voided or credited — whichever suits its status — and the new one takes its place. Clearing the account credits the invoice back.
- Deleting is blocked while a live invoice exists. Void or delete the invoice first, then delete the record.
Invoicing a cash sale
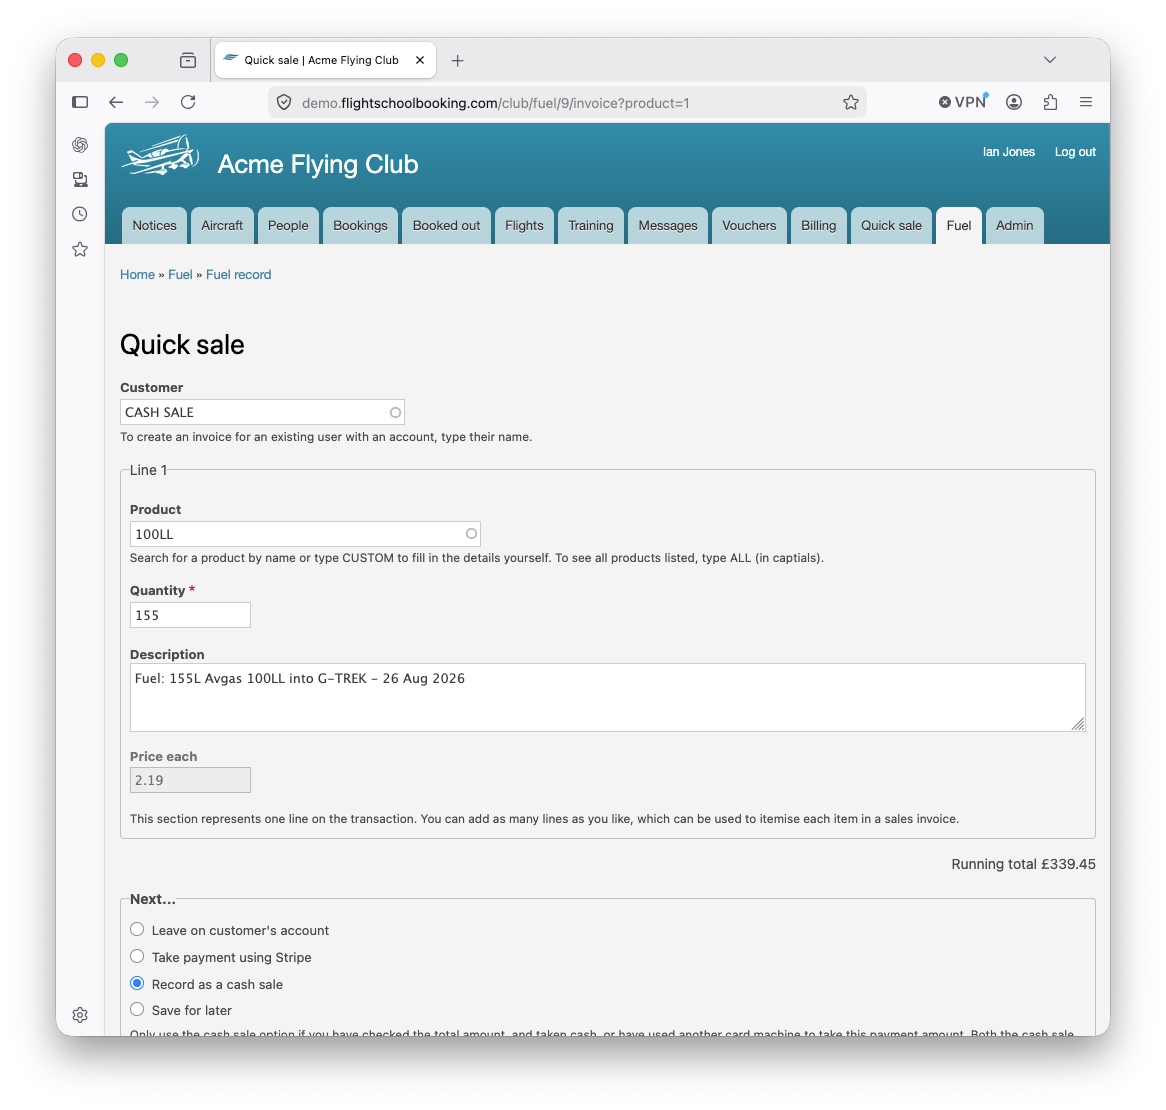
A fuelling with no account shows + Invoice in the Reference column. Clicking it opens the standard Quick Sale form with the litres and the line description already filled in, and the tank's billing product pre-selected. Complete the sale as a cash sale or against a customer, take a card payment if you want to, and the invoice is linked back to the fuel record.
Suggested routines
Every fuelling. Whoever pumps the fuel records it at the time, with the meter reading and the account if it is going on one. Ten seconds at the pump saves an hour at month end.
Weekly, or at every delivery. Dip each tank and record the reading. Anything red is worth investigating while people still remember the week.
At month end. Open the Fuel tab. Every uninvoiced count should be zero. Where it is not, click the count to see just those entries and either assign an account or raise a quick sale. Then export each tank's log to CSV for your records if you want a paper trail.
When a tank goes out of service. Under Admin > Fuel > Tanks, use Decommission. The history is kept and any fuel still waiting to be invoiced can still be invoiced, but no new fuel can be recorded against it and it drops out of the main lists. Recommission brings it back. A tank that has never had anything recorded against it is simply deleted instead.
Troubleshooting
An entry is amber. — The meter moved further than the litres recorded. Look for a fuelling that was not written up and add it as a Backdated entry at the right date and time; the flag clears itself. If the pump was calibrated, record that instead with Pump calibrated. Note that a meter that has rolled past zero is understood and not flagged.
A dip is red. — The tank does not hold what the paperwork says. Check for an unrecorded fuelling or an unrecorded delivery. Once found and entered, the dip re-checks itself.
"The fuel could not be invoiced automatically." — Either the tank has no billing product, or billing is not enabled for that customer. Fix the cause if it is a setting, and use + Invoice on the fuel log to bill the entry in the meantime.
Somebody cannot see the Fuel tab. — Check they have Access the Fuel tab under Admin > Fuel > Permissions, and that System availability is Enabled.